Gameplay MCP Server for Unity
Model context protocol (MCP) server for gameplay. Provides tools that AI models play your game via the MCP by embedding in your runtime (player build).
Key Features
- Built-in Tools — Let AI models list available UI actions, interact with UI elements, inspect GameObjects, capture screenshots, and query loaded scenes — all out of the box.
- Customizable and extensible — Built on the UI Test Helper package and MCP C# SDK. Customize operators, reachability strategies, and interactable detection to match your game's UI, and add custom tools with just
[McpServerToolType]and[McpServerTool]attributes. - Works with IL2CPP builds — You can run the MCP server on your player build, including IL2CPP.
Limitations
- WebGL platform is not supported.
Required
- Unity 2023.1 or newer
- MCP C# SDK NuGet package v1.0.0 or newer
- UI Test Helper package v1.2.2 or newer
- Test Helper package v1.4.1 or newer
Built-in Tools
Most built-in tools are wrappers of UI Test Helper APIs.
Note
The tool name is prefixed with the namespace. The default namespace is mygame, so it will look like mygame.inspect_game_object.
list_available_actions
Returns a list of operable actions as a JSON array. Each entry contains a target GameObject and the operator class name that can act on it. For Button components, the text label and texture name are also included in the target.
- reachable — If
true(default), only reachable GameObjects are included.
invoke_action
Finds a reachable GameObject and executes the specified operator on it.
- operatorName — Concrete operator class name (e.g.,
"UguiClickOperator"). - path — Hierarchy path separated by
/. Supports glob wildcards (?,*,**). - name — GameObject name.
- text — Text label on a Button component child. If specified, uses
ButtonMatcher. - texture — Texture/sprite name on a Button component. If specified, uses
ButtonMatcher. - operatorArgs — Operator-specific arguments as a JSON string. The JSON keys must match the parameter names of the operator's
OperateAsyncmethod overloads. Known arguments for built-in operators:IClickAndHoldOperator:{"holdMillis": 1000}IDragAndDropOperator(by GameObject):{"destination": {"name": "DropTarget"}, "dragSpeed": 50}IDragAndDropOperator(by screen point):{"destination": [100.0, 200.0], "dragSpeed": 50}IScrollWheelOperator:{"direction": [0.0, 1.0], "distance": 100, "scrollSpeed": 50}ISwipeOperator:{"direction": [1.0, 0.0], "swipeSpeed": 100}ITextInputOperator:{"text": "input text"}IToggleOperator:{"isOn": true}- Parameters with default values (e.g.,
dragSpeed,scrollSpeed,swipeSpeed) can be omitted. - When a parameter type is
GameObject, specify it as{"name": "...", "path": "...", "text": "...", "texture": "..."}— the tool will find and verify reachability automatically.
inspect_game_object
Inspect a GameObject by name, path, text label, or texture name and returns properties as JSON. Waits for the GameObject to appear and become reachable within a timeout period.
- path — Hierarchy path separated by
/. Supports glob wildcards (?,*,**). - name — GameObject name.
- text — Text label on a Button component child. If specified, uses
ButtonMatcher. - texture — Texture/sprite name on a Button component. If specified, uses
ButtonMatcher. - reachable — If
true(default), only reachable GameObjects are returned.
take_screenshot
Captures the current game screen and returns it as an image.
- maxPixels — Maximum length of the long side in pixels. The image is scaled down if it exceeds this value. Defaults to
1568. - format — Image format:
"jpeg"(default) or"png". - quality — JPEG encoding quality (1–100). Only used when
formatis"jpeg". Defaults to75.
list_scenes
Returns the currently loaded scenes as JSON. The active scene is marked with active=true.
No parameters.
Tip
The list_scenes tool only provides a simplified game state.
You need to create a custom tool that returns more detailed game states so the model can determine the appropriate course of action.
Adding Custom Tools
Any type annotated with [McpServerToolType] is discovered automatically at server startup, and any public static method on that type annotated with [McpServerTool] is registered as a tool — no registration required.
// Assets/Scripts/Runtime/MyGameTools.cs (custom tools created by the game title)
// Just add [McpServerToolType] and it's registered automatically!
[McpServerToolType]
public static class MyGameTools
{
    [McpServerTool(Name = "get_player_status", ReadOnly = true, Destructive = false)]
    [Description("Returns the player's current status as JSON.")]
    [Preserve]
    public static async Task<string> GetPlayerStatus(
        McpConfig config = null,    // injected automatically
        CancellationToken ct = default)
    {
        await UniTask.SwitchToMainThread(ct);
        var player = GameObject.FindWithTag("Player");
        return JsonSerializer.Serialize(new { hp = player.GetComponent<Health>().Current });
    }
}
Important
In IL2CPP builds, custom tool types are discovered via reflection and may be removed by the managed code stripper. Add [Preserve] attribute to your tool method.
Tip
If your custom tool needs access to McpConfig (e.g., to use GameObjectFinder or OperatorPool), declare it as a parameter with a default of null — it is injected automatically at runtime.
If a custom tool covers the same use case as a built-in tool, you can disable the built-in tool using DisabledTools:
var config = new McpConfig();
config.DisabledTools.Add("mygame.list_scenes"); // use the full prefixed name
Agent Skills
When providing instructions to an AI model, consider defining the following as skills:
- Screen transition and navigation — Even if the instructions describe high-level goals rather than step-by-step procedures, the AI needs to know the screen structure and which buttons navigate to which screens.
- Game rules and knowledge — If you want the AI to play autonomously, it will need knowledge of game rules, items, and mechanics.
- Custom operator parameters — If your game title uses custom operators with non-obvious parameters, document how to specify those parameters as part of the skill.
- Troubleshooting — Convert the troubleshooting information from the UI Test Helper into a skill, so the AI can resolve issues such as failing to find an operation target.
- Screenshot format recommendations — The default format is JPEG with quality 75, which works for most cases. Consider adjusting in these situations:
- Increase JPEG quality — If the game has fine visual details that are lost at quality 75.
- Use PNG — PNG is preferred in the following cases:
- When the AI needs to accurately read UI text.
- For pixel art games where compression artifacts are visible.
- When pixel-level accuracy is required for debugging purposes (e.g., visual regression testing).
Getting Started
1. Install dependent NuGet packages
Install the MCP C# SDK NuGet package v1.0.0 or newer with OpenUPM (via UnityNuGet), NuGetForUnity, or your preferred method.
If installing via OpenUPM:
- Open the Project Settings window (Edit > Project Settings) and select Package Manager tab
- Click + button under the Scoped Registries and enter the following settings:
- Name:
unitynuget-registry.openupm.com - URL:
https://unitynuget-registry.openupm.com - Scope(s):
org.nuget
- Name:
- Open the Package Manager window (Window > Package Manager) and select My Registries tab
- Select ModelContextProtocol (NuGet) and click the Install button
2. Install via Package Manager window
- Open the Project Settings window (Edit > Project Settings) and select Package Manager tab (figure 1)
- Click + button under the Scoped Registries and enter the following settings:
- Name:
package.openupm.com - URL:
https://package.openupm.com - Scope(s):
com.nowsprintingandcom.cysharp
- Name:
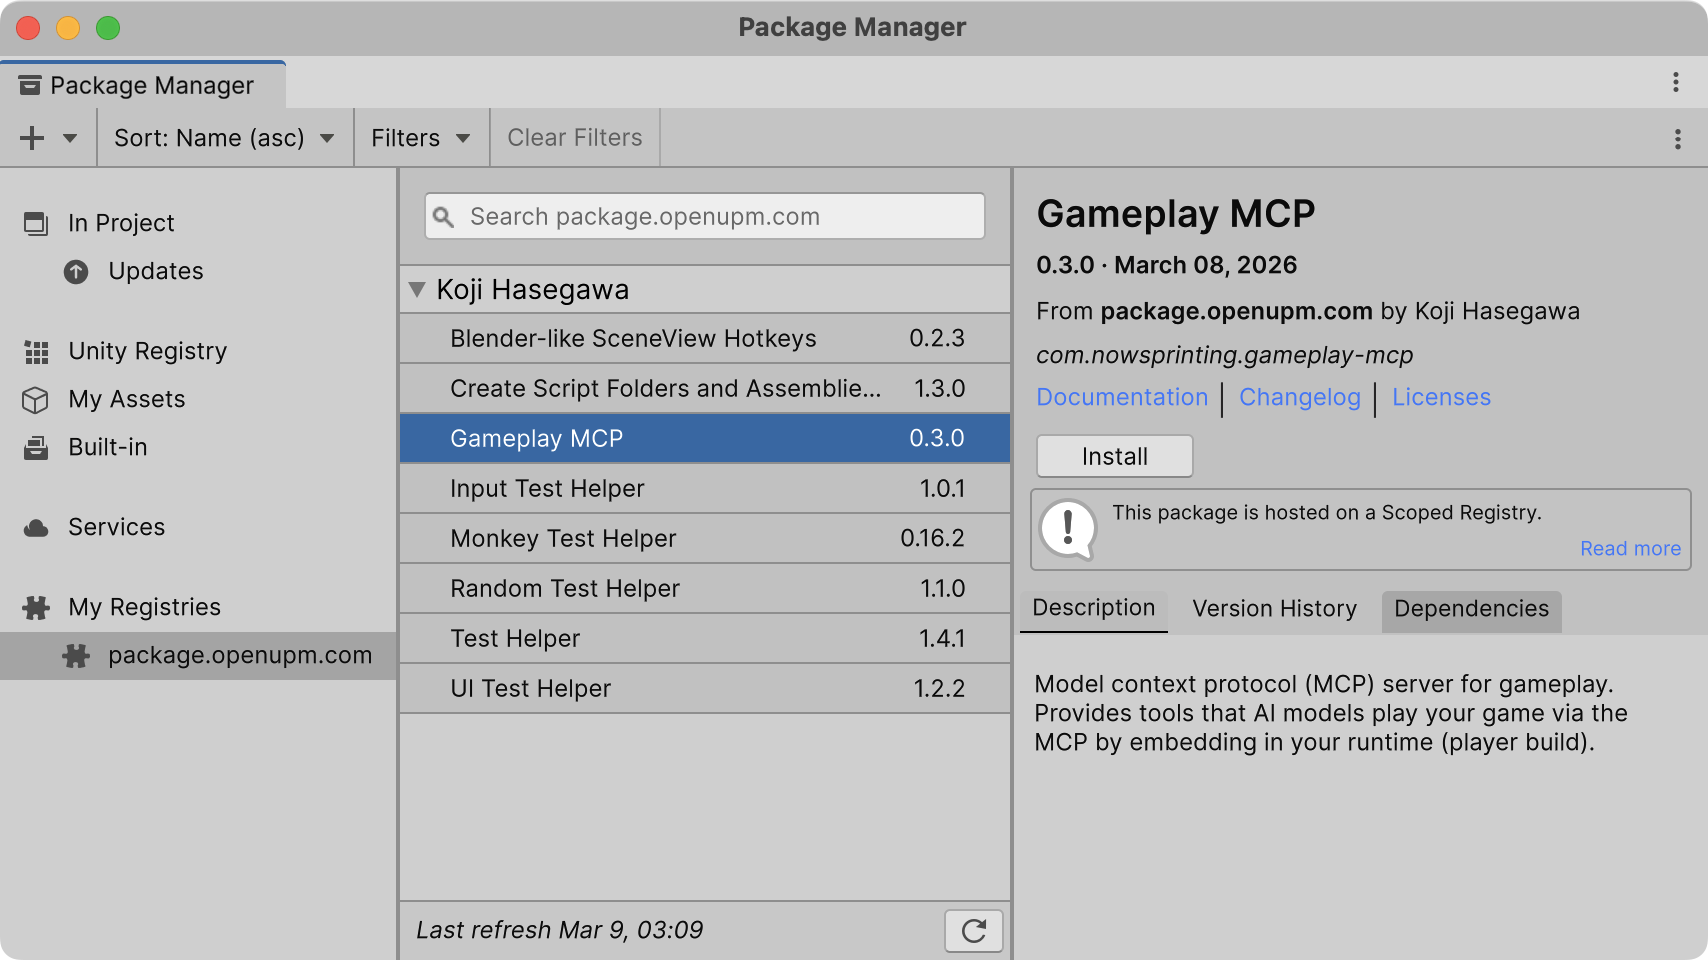
- Open the Package Manager window (Window > Package Manager) and select My Registries tab (figure 2)
- Select Gameplay MCP and click the Install button
Note
Do not forget to add com.cysharp into scopes. These are used within this package.
Figure 1. Scoped Registries setting in Project Settings window
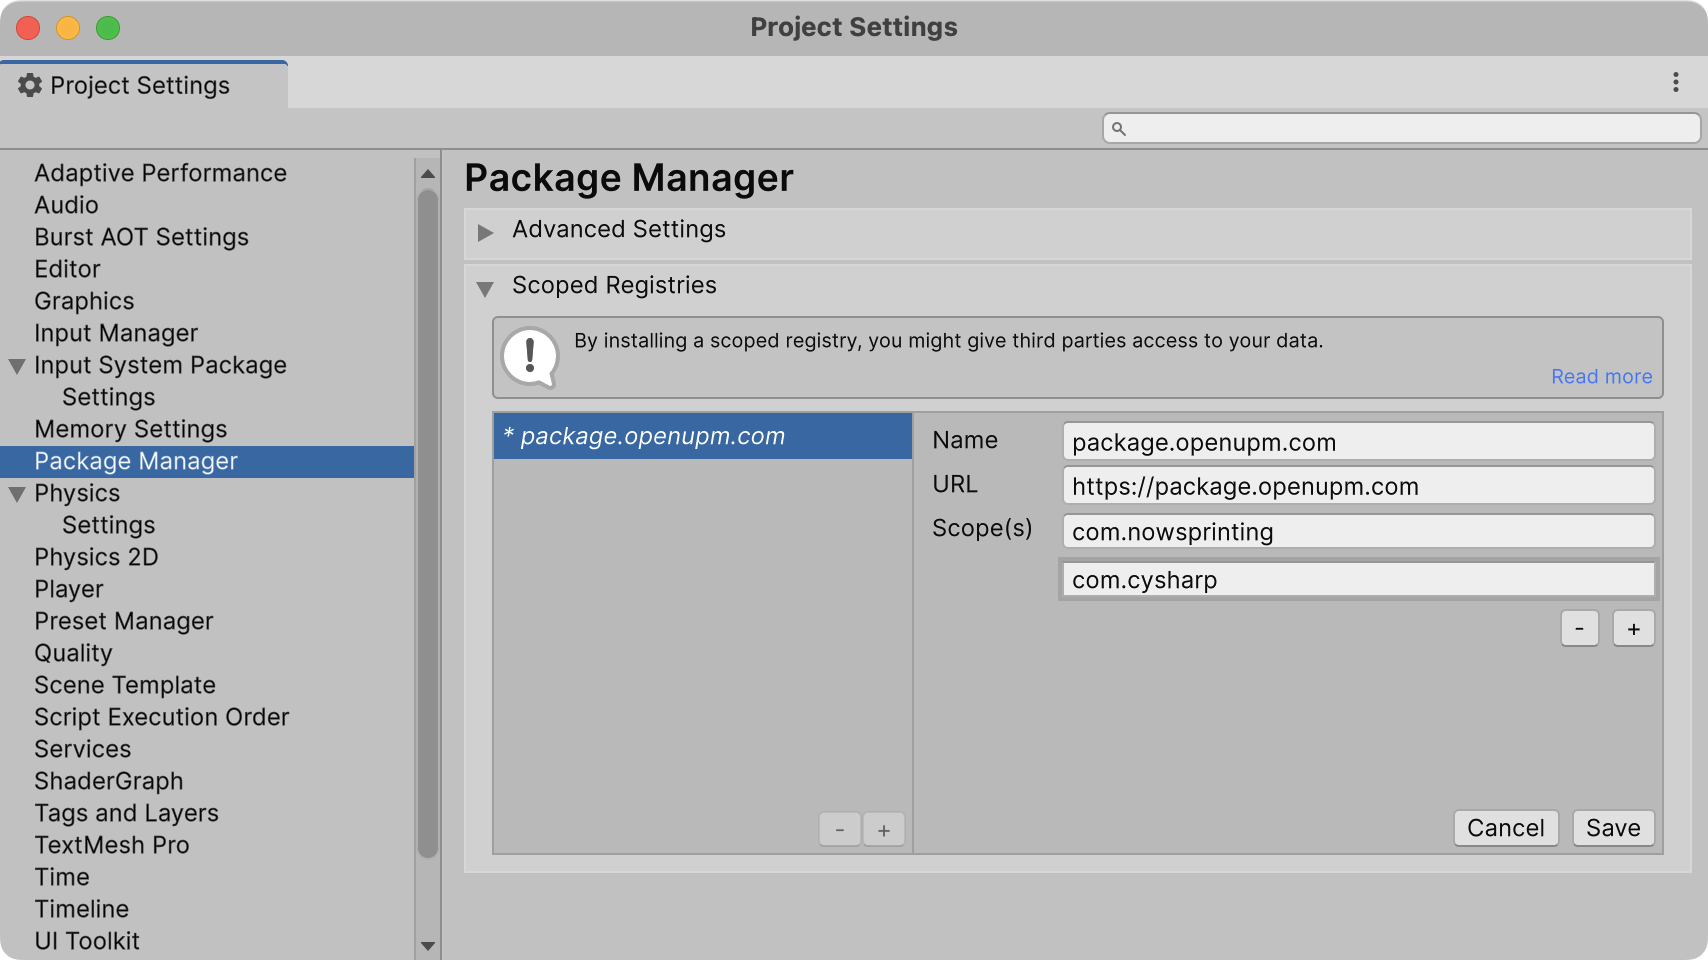
Figure 2. My Registries in Package Manager window
3. Start the MCP Server
Start the MCP server from your game title's code. A typical approach is to use [RuntimeInitializeOnLoadMethod] attribute for automatic startup, or toggle it on/off from a debug menu.
var config = new McpConfig
{
    OperatorPool = new OperatorPool()
        .Register<UguiClickOperator>()
        .Register<UguiDragAndDropOperator>()
        .Register<UguiTextInputOperator>()
};
var server = new McpServer(config);
server.StartAsync().Forget();
McpConfig exposes additional settings beyond OperatorPool, including GameObjectFinder, IsInteractable, ReachableStrategy, and ToolsNamespace. Refer to the UI Test Helper documentation for details on the UI-related configuration options.
Tip
You can override the listen prefix via the -gameplayMcpListenPrefix command-line argument. Note that if ListenPrefix is set in McpConfig, it takes precedence over the command-line argument.
To stop the server from a debug menu if you need:
server.Dispose();
4. MCP Settings in Coding Agent
Add the MCP server configuration to your coding agent. e.g.,
{
  "mcpServers": {
    "gameplay": {
      "type": "http",
      "url": "http://localhost:8010/mcp"
    }
  }
}
License
MIT License
How to contribute
Open an issue or create a pull request.
Please ensure each PR has at least one appropriate label, such as enhancement, bug, chore, or documentation.
See PR Labeler settings for automatically labeling from the branch name.